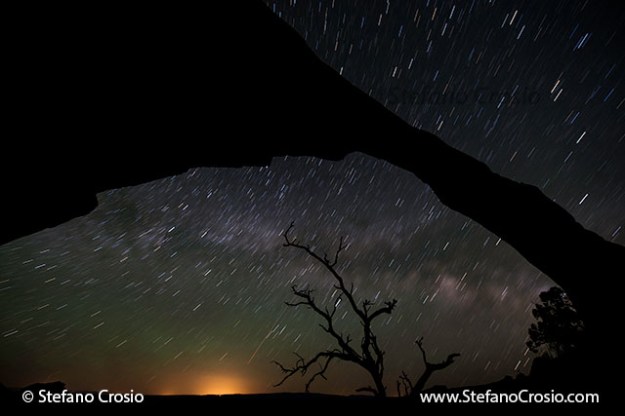
I took this image of Landscape Arch at Arches National Park at night (which you actually can see much better on my Web site), with the lights of the town of Moab in the background. With certain over photographed subjects, sometimes you need to be creative to come up with images that are not cliché and that still represent those towering creations of nature in their beauty and wildness. Night photography can be an option to resort to, if you are prepared to adjust your meal schedule around it and if you master the technique to get the shot.
A few tips on night photography:
1. Scout your spot earlier in the day to previsualize your shot and identify where precisely you will want to set up later in the day
2. Get to your spot before sunset so, if suitable, you can squeeze in some bonus sunset shots but most importantly you can set up your gear, frame your shot and focus when you can still see something!
3. If you shoot digital, (i) make sure the long exposure noise reduction function of your camera and, if it has one, its mirror lock up feature are activated; (ii) secure your camera to a sturdy tripod; (iii) with your camera in M exposure mode, set your aperture to a low f/stop (say anywhere between f/2.8 and f/4.0 or thereabouts) and set your shutter speed and ISO to a base exposure (of course, you will have to slow down your shutter speed as the night progresses); (iv) if you have a cable release (which you definitely should), connect it to your camera
4. Shoot a series of images, starting from twilight (when the sky will still be tinged with delicate orange, pink, magenta and violet hues) going forward to when the sky will turn pitch black, adjusting your exposure accordingly
5. Decide whether you want the stars to record as dots or streaks of light (star trails) and set your shutter speed/ISO accordingly (for best results, try to keep your ISO as low as possible, but you may have to compromise a bit): as a rule of thumb, bear in mind that anything slower than say 15/20 sec will cause at least some of the stars to streak noticeably – for pleasing star trails you will need exposures north of 30 seconds up to several minutes or even hours (the longer the exposure, the longer the trails – remember, every time you double the time the shutter stays open, with the others parameters staying the same, you add one extra stop of light to your exposure): this means that on your camera your shutter speed dial shall be set to Bulb and you will have to use a cable release and to experiment timing your exposure yourself (an illuminated digital watch may come in handy)
6. Be aware that the longer your exposure, the greater the chances that orbiting satellites and commercial airplanes will ruin your shot leaving all sorts of dotted luminous trails across it…
And by the way, today in the US is Nature Photography Day, a day that in the last 8 years has been designated by NANPA (the North American Nature Photography Association) “to promote the enjoyment of nature photography, and to explain how images have been used to advance the cause of conservation and protect plants, wildlife, and landscapes locally and worldwide”. So, if you are game, you might as well be inspired by the night photography tips on this post and go out with your camera and tripod tonight to give it a shot! 🙂
If you would like to see more images of mine, feel free to browse my Galleries.
As per my copyright notice, please respect my work and do not download, reproduce or use the image above without first seeking my consent. Thank you 


