Tag Archives: technique

Meet the Maker: Valtellina’s Nebbiolo – An Interview with Ar.Pe.Pe.’s Enologist

On previous posts, we have presented the Italian wine district of Valtellina and introduced one of the finest Valtellina wine producersAr.Pe.Pe. along with a tasting of their wines.

On this post, which concludes our mini-series about Valtellina, you can find an interview that Ar.Pe.Pe.’s enologist and co-owner Isabella Pellizzatti Perego was kind enough to do with me.

Ar.Pe.Pe.'s enologist and co-owner in their stunning tasting room

Here are the questions I asked Isabella, along with a summary of her answers – let me give you heads up about the fact that some of the discussion is fairly technical in nature, but at the same time I think it is very interesting and educational:

Q1. First of all, would you care to explain the logic behind the various labels in your lineup and their release to the market? I understand they are not all available every year, so maybe you can elaborate a little bit on that?

A1. Certainly: essentially, we are pretty black and white with our production – let me try to explain.

At the top of our range there are the following four Crus or Riservas: Grumello Buon Consiglio; Sassella Rocce Rosse; Sassella Vigna Regina; and Sassella Ultimi Raggi.

These current Crus will soon be complemented by two new Crus that we have started making since the 2009 vintage and that are currently at the beginning of their aging phase. These new wines will be released to the market in 2018: one is our first Riserva from our vineyard in the Inferno subzone and the other one is a new Riserva from our Grumello vineyards that is going to complement our Buon Consiglio Cru.


Ar.Pe.Pe.'s 5.5 HL wood tonneau aging casks

Beside those, we have the Inferno Fiamme Antiche which, so far, is the only label that we make from our vineyard in the Inferno subzone. When our new Inferno Cru becomes available, the Inferno Fiamme Antiche will be its second vin.

Finally, there is our entry-level, easy and ready to drink wine known as Rosso di Valtellina.

Now, the Rosso di Valtellina is the only one of our wines that is available every year.

Instead, our concept for our premium wines is that, depending on our assessment as to the quality of the grapes we harvest, we decide whether they are worthy of a Cru or they should be “downgraded” to second vin. We do not compromise: the entire crop for each subzone either becomes a Cru or a second vin.

So, for instance, if one year you see that we release the Grumello Buon Consiglio Riserva, that means that for that year the Grumello Rocca De Piro will not be released, and vice versa, which of course entails a significant sacrifice in terms of revenues. But we are happy this way: we want to stand behind the quality and reputation of our wines and we do not take any shortcut to do so.

Mountain Nebbiolo grapes in Ar.Pe.Pe.'s destemmer

Q2. The mountain Nebbiolo of Valtellina has been recognized as a biotype that is geographically distinct from Piemonte’s Nebbiolo and several clones have been identified. Can you tell us something about the clonal choices that you made in your vineyards?

A2. Valtellina’s Nebbiolo presents greater biodiversity in its clones compared to Piemonte’s Langhe Nebbiolo (where the three main clones are Michet, Lampia and Rosé). In Valtellina at least 10 different clones have been identified. For our vineyards, we have selected a mix of the various clones and we are observing how each of them has adapted to our terroir and how it performs. This way, we can identify the vines that perform best and then use those same clones to add new vines or replace existing ones.

Q3. Let’s talk a little bit about viticulture: what’s the average density and age of your vineyards? Are your vines all grafted? Which month of the year do you harvest and is it all done by hand?

Helicopter carrying Nino Negri's harvested mountain Nebbiolo grapes

A3. Our average density is 5,500/6,000 vines/HA and on average our vines are 50 years old – most are grafted, but there still are a few plants that are ungrafted.

We harvest exclusively by hand due to the characteristics of our territory, which prevent the use of anything mechanical. It is pretty much the same for all of the Valtellina producers, although some (such as Nino Negri) go as far as using helicopters to carry the crates with the harvested grapes as fast as possible to the winery. In general, we harvest the grapes for all our wines in the second half of October, except only those for our Ultimi Raggi Cru (which is our late-harvest wine) which get picked in the second half of November, just before the first snow of the season.

Q4. Speaking of the Ultimi Raggi: this is a wine that falls within the Valtellina Superiore Riserva DOCG appellation (subzone Sassella). Since it is a dry raisin wine, can it be considered your own take of a Sforzato della Valtellina? Why does it not fall within that separate DOCG?

A4. Well, yes and no: our Ultimi Raggi is a late-harvest dry raisin wine like a Sforzato, but it cannot be classified as such as the regulations for the Sforzato della Valtellina DOCG appellation require that the grapes be picked during the regular harvest season and then be dried on straw mats (in other words, it is not a late-harvest wine).

Instead, with the Ultimi Raggi we have made the choice of drying the grapes while they are still on the vine, by picking them generally a month later than the regular harvest. It is a riskier choice, because a few years ago we had just finished harvesting the last vines for the Ultimi Raggi when it started snowing: had it happened one day earlier, a large part of our harvest would have been lost. So, it is a riskier choice, but we feel that it really pays off in terms of the quality of the wine that we make.

Q5. How do you feel about organic viticulture? Is it something you are considering embracing?

A5. We practice an integrated approach to viticulture, which imposes very restrictive practices already. We would love to go all the way to organic, but considering our geography, that is made of steep mountain slopes and makes it impossible for us to mechanize anything, currently we are not in a position to incur even greater labor costs. Just think that the integrated viticulture approach that we practice results in 1,300 working hours per year for each hectare of vineyards: more than twice the number of man hours that are required in Piemonte’s Langhe and about three times as many as those required to harvest hill vineyards in general.


Delastage "rack and return" process of Ar.Pe.Pe.'s fermenting must

Q6. Let’s move on to your ultra-conservative winemaking choices: what kind of vats do you use to ferment your wines? Also, do your wines do malolactic fermentation? And for both fermentations, do you use selected yeasts and acid bacteria or are both fermentations spontaneous?

A6. We still use 50 HL wood barrels to ferment our wines: we have them made using the same traditional, proprietary mix of oak, chestnut and acacia that we use for our aging barrels. Then, after each fermentation, we gently scrape the inside of the barrels to remove any possible residue. It is a lot of work compared to just using stainless steel vats, but we think it is worthwhile because of the additional flavor and smoothness it contributes to our wines.

All of our wines go through a couple of day of pre-fermentative cold maceration to maximize the extraction of color and primary aromas, then they go through spontaneous alcoholic fermentation using only indigenous yeasts and finally they do a full, spontaneous malolactic fermentation that is kick started by careful temperature control.

Q7. What kind of barrels do you use for aging your wines and what is the main driver for your choice?

Ar.Pe.Pe.'s aging barrels

A7. As is the case for our fermenting vats, we use large 55 HL wood barrels for aging our wines too: these are made of a proprietary mix of oak, chestnut and acacia woods that we have traditionally been using from the very beginning. We also have a few smaller 5.5 HL tonneau casks made of the same wood mix that we sometimes use, but it is an exception.

In addition, none of our aging barrels is toasted: we only use un-toasted wood to minimize the release of tertiary aromas/flavors to our wines. We made this conservative choice because we want our wines to underscore primary and secondary aromas and to be a reflection of their unique terroir. Anyone can add spicy notes to a wine that, in itself, could be not very exciting: we want our consumers to appreciate our wines for the story they tell about our grapes, our territory and the environment our vines grow in.

Q8. Speaking of terroir, how would you briefly describe that of your vineyards? Also, how would you say that the wines made from grapes grown in the three different subzones you have vineyards in (Sassella, Inferno and Grumello) differ from one another?


Valtellina mountain vineyardsA8. The Valtellina district of Lombardia counts a little over 800 HA of vineyards altogether, and our grapevines grow on mountain slopes at an average altitude ranging from 400 to 600 mt (1,300 to 2,000 ft) above sea level. The soil here is scarce, as rocks abound.

This is also one of the main differences between the Grumello subzone versus the Sassella and Inferno subzones: the former has somewhat more soil, it is less rocky and this makes for easier, readier to drink wines, whilst the latter subzones have very little soil and rocks prevail – this makes the wines coming from these areas more austere and dependent on longer aging periods to properly assemble and integrate their components and smooth their edges.

Q9. Now, regarding the commercial aspects of your business: your annual production is about 60,000 bottles – what is roughly the split between export and domestic consumption? Which are the top three countries to which you export?

A9. This year marks the first time that we export more than we sell domestically: 60% of our production has in fact been exported.

Geographically, the USA is the top country we export to, Japan is the second and Russia (which we just started exporting to this year) came in third. This year we also started selling to a few new countries beside Russia, among which Hong Kong, Taiwan and a market that we are excited to finally be in Canada – our Rosso di Valtellina will be soon available in Quebec and we are very excited about this new challenge.

Q10. Finally, are there any new projects that you are working on that are worth pointing out to our readers?


Ar.Pe.Pe.'s fermenting barrelsA10. Yes, definitely. We already talked about the two new Crus which will become available in 2018, for which we are very excited and feel very strongly about their quality and potential.

Beside such product news, from a viticultural perspective we have decided to convert our vineyards to the Simonit-Sirch pruning method for controlled grapevine growth. In the context of a Guyot-type training system like the one we use in our vineyards, this method has the objective to optimize the performance of each vine through selective pruning of only young (one or two year old) stems growing out of the head of the trunk.

The purpose of this is to cause the vine to develop two main stems that originate from opposite sides of the head of the trunk and run parallel to the bending wire, giving the vine a characteristic T-shape. This optimizes the canalization of the plant’s lymph into such two main vessels and makes a vine grown with a Guyot-type training system more similar to a free-standing bush vine, which nowadays is considered the most efficient vine training system and one that considerably increases the life expectancy of the vine.


Ar.Pe.Pe.'s stunning tasting room

That’s all: hope you enjoyed the read, and let me thank Isabella once again for her exquisite hospitality and for being so patient as to answer all of my questions! 🙂

Advertisement

Nikon D800 & Action Photography: a Swiss Army Knife?

USA, Nantucket (MA)
 Kite surfer on a windy day

Nikon D800, Nikkor AF-S 70-200 f/2.8G VR II; 1/1600 sec @ f/5.6, ISO 250

After my previous post about how to effectively customize a Nikon D800 so as to make it work the way you want/need, a question from a reader prompted me to write again about the D800 and explain why I think that, if properly configured, the D800 is a dream camera (at least in the Nikon camp) and a star performer not only for photographing still subjects but also action.

Let’s start from a few basic facts: the D800 has a so-called “FX” format full-frame CMOS sensor, capable of recording images at the stunning resolution of 36MP in the traditional 35mm format of 24×36. At this resolution, the D800 resolves much more detail than any “legacy” 35mm film-based camera and approaches medium-format territory. The flip side of such phenomenal resolution is that, given the huge amount of data that the camera needs to move from the sensor to the flash card, at maximum resolution the D800 achieves a relatively slow continuous shooting speed of 4 FPS (frames per second). In addition, if you are shooting NEF (i.e., RAW files – which I think you should for the reasons explained on a previous post), even with a fast CF card the buffer would fill after about 17 consecutive shots (using the “14-bit lossless compressed” NEF setting).

While of course the above limitations are not a concern if/when you shoot stationary subjects, they will most likely get in the way if you plan to also use your D800 to shoot action.

USA, Nantucket (MA) 
Kite surfer on a windy day

Nikon D800, Nikkor AF-S 70-200 f/2.8G VR II; 1/1600 sec @ f/5.6, ISO 250

So, is all hope lost and do you need to resign yourself (as many have lamented on the World Wide Web) to choose the D800 if you shoot landscapes/portraiture/architecture OR the D4 if you shoot sports or active wildlife?…

The short answer is: not really.

Let me explain why. Your D800 could be compared to a Swiss Army knife: if you have the corkscrew tool out, your versatile knife will let you pop a bottle nice and easy, but will it be as effective a tool to, say, cut an unplugged electrical wire? Of course not: to do that you will have to switch to the appropriate tool for the job, a blade.

Much the same way, Nikon engineers did not pack all that unbelievable technology in the D800 for no reason: you need to configure your camera so as to maximize its capabilities of shooting action.

USA, Nantucket (MA) 
Windsurfer on a windy day

Nikon D800, Nikkor AF-S 70-200 f/2.8G VR II; 1/1600 sec @ f/5.6, ISO 200

Let’s see what I think you should do:

  1. Set the AF Mode to AF-C (Continuous Servo AF) and the Release Mode to CH (Continuous Shooting – High Speed)
    *
  2. If you shoot NEF (as you should), set your compression to “14-bit Lossless Compressed”
    *
  3. Set the Image Area function to the DX (24×16) format
    *
  4. Use a fast CF (or SD) Card! For best results, get an UDMA 7 card, such as Lexar Professional 1000x or SanDisk Extreme Pro UDMA 7
    *
  5. Purchase the optional MB-D12 external battery grip (note that the street price for it in the US is almost 50% less than what Nikon USA charges) and a D4 battery (EN-EL18) and connect them to your D800

USA, Nantucket (MA)
 Kite surfer on a windy day

Nikon D800, Nikkor AF-S 70-200 f/2.8G VR II; 1/1600 sec @ f/5.6, ISO 250

That’s it! By configuring your camera as above, you achieve the following benefits for action photography:

  • You maximize the D800 “base” 4 FPS rate, by increasing it by 50% to 6 FPS, which is adequate for most action shooting scenarios, barring only those involving extremely fast moving subjects (such as if you professionally shoot F1/NASCAR/MotoGP)
    *
  • You increase the number of images that can be saved to the buffer before this fills up by 70%, from 17 to 29, depending on how fast your memory card is
    *
  • Although by switching to the DX image format you reduce the file size from 36MP to 15MP, your image size is still going to be plenty enough to print even large photographs or to submit to agencies/magazines
    *
  • By switching to the DX image format, you get the “1.5x magnification” effect typical of such format, which effectively adds 50% to the focal length of your long lens, something desirable for most action shooters who, no matter how long a lens they are shooting with, often find themselves hoping it were even longer! (A technical note: technically speaking, it is incorrect to call such effect a “magnification” as by switching to DX there is no optical difference – what happens is that the file you get is just an in-camera crop of the center portion of your full-frame FX image. But in practical terms your image, at the reduced DX size, will be very similar to the image that you would get if you used a 50% longer lens at the larger FX size)

USA, Nantucket (MA)
 Kite surfer on a windy day

Nikon D800, Nikkor AF-S 70-200 f/2.8G VR II; 1/1600 sec @ f/5.6, ISO 250

Also, the accuracy of the D800’s Multi-CAM 3500FX autofocus sensor module and 15 cross-type AF sensors is phenomenal – it really nails down the focus on almost all images, so much so that you will soon come to realize that, if you have occasional out of focus shots, in most cases it is due to operator error, not inaccurate technology!

One final note: for your convenience, you may decide to assign one of the four customizable Shooting Menu Banks available on the D800 to your action shooting settings, so that you may recall them at any time with just one click. See page 268 of the D800 User Manual for instructions how to set it up.

Now have fun and go shoot some action with your Swiss Army knife D800! 🙂

USA, Nantucket (MA)
 Kite surfer on a windy day

Nikon D800, Nikkor AF-S 70-200 f/2.8G VR II; 1/1600 sec @ f/5.6, ISO 200

Nikon D800: How To Customize It Effectively

If you have been following the photography part of this blog for a while, you will have noticed that I do not talk about equipment, let alone brands, because I think what matters most are the principles of photography and, ultimately, the photographer who is behind the camera. A photographer may have the best gear in the world, but if he/she does not master the technique to make the best of it or lacks creativity or artistic sensitivity, then the resulting photographs will be either technically inadequate or incapable of expressing an artistic message.

However, a dear reader who knows I have (and love) a Nikon D800 and who has recently bought one herself asked whether I would post some advice as to how to effectively set it up, so here I am talking about equipment! 😉

Saint Emilion Restaurant

In my view, the D800 is a wonderfully capable and powerful camera, that offers the photographer a myriad of options for customizing it just the way that specific photographer needs to suit his/her photography style. In this post I will focus on pointing out some of those that *FOR ME* are the most useful options that I take advantage of to make my D800 work the way I want based on how I shoot. Of course, other photographers may have different needs, so what follows may work for me but not for you – your mileage may vary 🙂

(A) Shooting Menu: These are the main options for which I have changed the defaults:

1. Primary Slot Selection: I changed it so the primary memory card to which images get saved on my D800 is the CF card, while the SD card only kicks in when the CF card is full (“overflow” option). This is because the latest CF cards are still faster than SD cards and trust me, with the unbelievable amount of data that the D800 moves to a memory card, you do need a fast UDMA 7 card if you do not want to fill the buffer too soon!

2. Image Quality: As you may have guessed already if you read my previous post about why one should consider shooting RAW instead of Jpeg, I set this to RAW. 😉

3. Jpeg Compression: For those rare instances when I shoot Jpeg, I set this option to “Optimal Quality.”

4. NEF (RAW) Recording: I set the compression option of NEF files to “Lossless Compressed” and bit depth to “14 bit”.

5. Color Space: I changed this to Adobe RGB as it provides a broader gamut than sRGB, which is a color space that is best assigned to an image at the time it is ready to be published on the Web. Bear in mind that the “color space” setting only affects images taken by the D800 as Jpegs, while it does not have an effect on NEF/RAW images for which the photographer can decide which color space to assign to them at the time of processing.

6. Auto ISO: Auto ISO is a feature that may come in handy on certain occasions, such as when shooting sports indoors (when light levels are generally dim) or wildlife on the move at the fringes of the day. The one setting of Auto ISO that I changed upfront is “Maximum Sensitivity”: this basically allows the photographer to instruct the D800 not to go higher than a certain ISO setting when Auto ISO is turned on. This is useful as it lets you set the highest ISO setting that you feel comfortable will return images with noise levels that are acceptable for their intended use. Personally, I set the limit on my D800 to 3200 ISO.

USA, Arches National Park (UT) Windows Arch at twilight

(B) Custom Settings Menu: The D800 has 54 custom settings that let you customize it just the way you want: use them! Below is a list of the custom settings that are the most useful to me:

a4AF activation: I prefer that my camera AF only activates when I want it to, so I changed a4 to make sure that the shutter release only takes the shot when tripped, without activating the AF. To do that, I assigned AF activation to the AF-ON button only, by selecting the option “AF-ON Only”. This way I have the utmost flexibility and I can activate my camera AF only when I want to.

d6Viewfinder Grid Display: I set this to “ON” so grid lines will show at all times in the viewfinder: this is helpful both not to tilt horizons when you handhold and to quickly identify strong compositional points in the frame according to the rule of thirds.

f4Assign Fn Button: There is a host of options here, so you should choose the one you think you are going to use the most. In my D800 I assigned it to spot metering mode, by choosing the “Spot Metering” option, so whenever I want to take a spot meter reading off a subject I just press the Fn button and there we go.

f6Assign AE-L/AF-L Button: This is one of my favorite customizations in the D800 – I assigned the button in combination with the subcommand dial (the one in the front of the camera) to “Select Image Area”. This way, whenever I want to change the active area of the sensor and therefore the size of the end image (which is something I do fairly often) I can do so in a breeze by just pressing the AE-L/AF-L button while rotating the subcommand dial: this toggles among the four available image sizes (FX – 36×24; 1.2x – 30×20; DX – 24×16; 5:4 – 30×24).

f11Slot Empty Release Lock: I set this to “Lock” – why would I want to trip the shutter when there is no memory card in the camera???

f12Reverse Indicators: In this option I chose “Reverse” so that the exposure indicator that appears in the viewfinder and in the top screen of my D800 has the + sign on the left and the – sign on the right. This is because I mostly shoot in Manual Exposure mode and I find it easier that the exposure indicator mimics the rotation of the camera dials. So for instance, if I rotate the main dial to the left to set a slower shutter speed (therefore increasing my exposure) the mark on the exposure indicator in the viewfinder will also move to the left toward the + sign, showing that my exposure is increasing (i.e., the image is getting lighter).

USA, Arches National Park (UT) Balanced Rock at twilight

(C) My Menu: This is a fully user customizable menu that I find incredibly helpful and I definitely suggest you set up and use. Essentially, you can add to it those of the options/custom settings of your D800 that you use the most so they can be all grouped in, and accessible from, one and the same spot as opposed to scattered across the various menus they belong to. To give you an idea, these are the options that I have assigned to mine: (i) Choose Image Area; (ii) Auto ISO; (iii) Long Exposure NR; (iv) Virtual Horizon; (v) d4-Exposure Delay Mode; (vi) Multiple Exposure Mode.

That’s all for now: I hope the above tips may be helpful to some D800 users who may have preferences/needs similar to mine.

In a future post I will discuss why I think the D800 (particularly if used in combination with the optional MB-D12 battery grip and a D4 battery) is a wonderfully flexible camera that fits many different shooting styles and subjects.

Happy shooting! 🙂

Raw Moves: Three Reasons for Shooting RAW Instead of Jpeg

Polar bears (Ursus maritimus) play-fightingCaption: Canada, Hudson Bay – Polar bears (Ursus maritimus) play-fighting

A while ago, the exquisite Fairy of the North, Dina (who so elegantly authors the blog The World According to Dina, masterfully combining her beautiful images with perfectly selected quotes to complement them) asked me if I would write a post about why I think anyone who shoots digital and takes his or her photography seriously should shoot RAW as opposed to straight off the camera Jpegs.

By the way, before we even get to the point, what is a RAW file, just in case you were wondering? A RAW file is essentially the equivalent of a film negative in the digital age. Every camera manufacturer has their own proprietary formats of files containing the raw (hence the name), unprocessed input captured by the sensor. In fact, RAW files are called in several different ways and have different extensions, depending on the various camera makers: for instance, Nikon’s are called NEF and Canon’s are called either CRW or CR2, depending on the models.

Unlike straight out of the camera Jpegs (which are the result of the camera’s computer processing the sensor data, making arbitrary choices that you as the photographer cannot control and producing a file format that is immediately viewable by anyone), RAW files need to be processed through specialized software such as the camera manufacturer’s proprietary processing software or third-party software such as Adobe PhotoShop or Lightroom or Apple Aperture and then converted to a usable file format, such as TIFF, PSD or Jpeg.

In essence, processing a RAW file requires more of the photographer’s time because he or she has choices to make (in terms of optimizing white balance, exposure, contrast, color balance/saturation, etc.) but puts the photographer back in control of his or her creative decisions and what’s best, in a totally non-destructive, reversible way (more on this later).

Having said that, here are the three main reasons why I think you should set your camera to shoot RAW instead of Jpeg:

1. Unlimited White Balance Adjustments: This is one of the most powerful reasons for choosing a RAW file over an in-camera Jpeg. In short: if for any reason you shoot an image using a white balance setting that is not optimal for the scene you are shooting and you have your camera set to produce a Jpeg file, then you are stuck with that suboptimal white balance and changing it (or at least improving it) will be a difficult and time-consuming task to be performed in your image processing software. If instead you shoot RAW, you can easily correct your white balance with just one click in your processing software. Done!

2. Lossless Process: Jpegs are image files that are considerably smaller than other formats. This is because they utilize a compression algorithm that is lossy, meaning that it discards a bunch of color information from the image to make the file smaller. The more you compress, the more subtle color transitions and image sharpness you lose. In addition, image data loss is cumulative, meaning that every time you save or re-save a Jpeg file, you lose information that cannot be recovered later on. If you shoot RAW instead, you retain all of the information captured by your camera’s sensor, forever. This means not only that, should you need to perform some intensive editing of your image you will have more information to work on, but also and more importantly that you will forever retain full access to all the information that the sensor originally captured.

3. Non-Destructive, Reversible Editing: If you shoot Jpeg and then edit your file in post processing you can then either keep it as a Jpeg when you save it (in which case, all your edits will become permanent AND you will experience image data loss when you save your processed Jpeg) or work using layers (if available in your processing software). The latter is definitely the way to go, because layers can always be discarded later on, should you wish to process your image differently. However, Jpegs do not support layers, so if you use them and want to retain them, you will have to save your processed file in a format that supports layers, such as TIFF or PSD which are both lossless formats but end up in bigger file sizes. Instead, if you shoot RAW and process your RAW file, all your edits will be stored in a so-called “sidecar file”, meaning a small text file that goes hand in hand with your RAW file and contains all the information about the edits that you performed. This means that your RAW file will never be altered and you will always be able to change any of your edits at any time in the future with no damage to your image file or information loss. Pretty cool, huh?

As a final note, even if after reading these compelling reasons for shooting RAW 😉 you were to choose to continue shooting in-camera Jpegs, at the very least make sure that as soon as you download them to your computer you immediately save them to a lossless image format: as we said earlier on, not only will this let you retain your adjustment layers if you so choose, but it will avoid image degradation every time you re-save that Jpeg.

Landscape Arch at Night and a Few Night Photography Tips

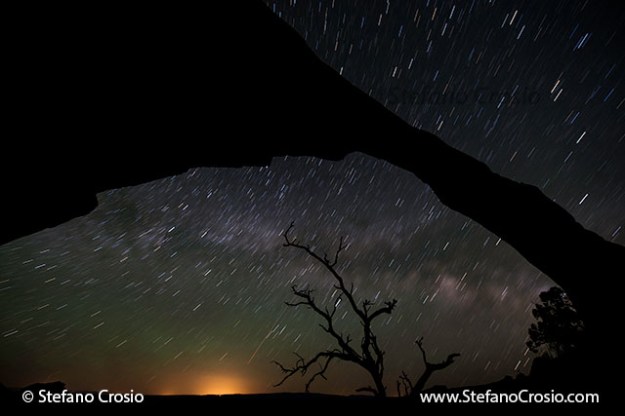
Landscape Arch at night

I took this image of Landscape Arch at Arches National Park at night (which you actually can see much better on my Web site), with the lights of the town of Moab in the background. With certain over photographed subjects, sometimes you need to be creative to come up with images that are not cliché and that still represent those towering creations of nature in their beauty and wildness. Night photography can be an option to resort to, if you are prepared to adjust your meal schedule around it and if you master the technique to get the shot.

A few tips on night photography:

1. Scout your spot earlier in the day to previsualize your shot and identify where precisely you will want to set up later in the day

2. Get to your spot before sunset so, if suitable, you can squeeze in some bonus sunset shots but most importantly you can set up your gear, frame your shot and focus when you can still see something!

3. If you shoot digital, (i) make sure the long exposure noise reduction function of your camera and, if it has one, its mirror lock up feature are activated; (ii) secure your camera to a sturdy tripod; (iii) with your camera in M exposure mode, set your aperture to a low f/stop (say anywhere between f/2.8 and f/4.0 or thereabouts) and set your shutter speed and ISO to a base exposure (of course, you will have to slow down your shutter speed as the night progresses); (iv) if you have a cable release (which you definitely should), connect it to your camera

4. Shoot a series of images, starting from twilight (when the sky will still be tinged with delicate orange, pink, magenta and violet hues) going forward to when the sky will turn pitch black, adjusting your exposure accordingly

5. Decide whether you want the stars to record as dots or streaks of light (star trails) and set your shutter speed/ISO accordingly (for best results, try to keep your ISO as low as possible, but you may have to compromise a bit): as a rule of thumb, bear in mind that anything slower than say 15/20 sec will cause at least some of the stars to streak noticeably – for pleasing star trails you will need exposures north of 30 seconds up to several minutes or even hours (the longer the exposure, the longer the trails – remember, every time you double the time the shutter stays open, with the others parameters staying the same, you add one extra stop of light to your exposure): this means that on your camera your shutter speed dial shall be set to Bulb and you will have to use a cable release and to experiment timing your exposure yourself (an illuminated digital watch may come in handy)

6. Be aware that the longer your exposure, the greater the chances that orbiting satellites and commercial airplanes will ruin your shot leaving all sorts of dotted luminous trails across it…

And by the way, today in the US is Nature Photography Day, a day that in the last 8 years has been designated by NANPA (the North American Nature Photography Association) “to promote the enjoyment of nature photography, and to explain how images have been used to advance the cause of conservation and protect plants, wildlife, and landscapes locally and worldwide”. So, if you are game, you might as well be inspired by the night photography tips on this post and go out with your camera and tripod tonight to give it a shot!  🙂

If you would like to see more images of mine, feel free to browse my Galleries.

As per my copyright notice, please respect my work and do not download, reproduce or use the image above without first seeking my consent. Thank you :-)

A Food Photography Primer

Over time, a few readers over at Flora’s Table who seem to have been enjoying the food images that I make and publish in that blog have been asking that I write a post with a few pointers about food photography: today is the day for that. Bear in mind that what follows is not intended to be a comprehensive course on food photography, but just a reflection on some basic rules of photography that play an important role in making a good food photograph.

There is no magic, food is just one of the subjects of studio photography and food photography is still photography, so the same basic principles apply. As such, there are three main guiding criteria that everyone with an interest in food photography should focus on:

1. Composition
2. Lighting
3. Post-Processing

Let’s take a closer look at each of them.

1. Composition

Composition is an element that can literally make or break a photograph. A successful image, including one of a food item, needs to have a strong, clean, balanced composition or it will look flat and boring at best. Here are a few pointers as to how to tackle this aspect:

  • Devise a plan before your shoot: pre-visualize how you would like your image to look like and figure out what you need to accomplish your vision (in terms of props, lighting, background and focal length of your lens)
  • Set up well ahead of time, when you have no time pressure: the shoot should be set up according to your plan and your vision, with everything in place except the food you are going to photograph. Take a few test shots in the same light that you would use for the real thing and see how your image looks like through the lens you chose. Use this opportunity to find out what does not work and to move things around or change camera/lighting settings until you achieve a pleasing composition that conveys your vision. Add the actual food item to be photographed only when you are all set and ready to go, so when you photograph it, it is going to be perfectly fresh, in top condition
  • Although composition is subjective and should convey your own vision, there are a few “rules” that will generally make your image a stronger one, including the following:
    • Less is more: keep your composition clean and simple;
    • Compose in such a way that the main subject of your image is immediately obvious to everyone;
    • Avoid blank space near the edges of your frame: make sure that your subject and other meaningful elements of your composition fill the frame in a balanced and pleasing way, making sure that you have a strong foreground, middle ground and background in your image;
    • Very rarely does a subject that is in the smack center of your image look good (unless you are going for an extreme close-up where your subject fills the entire frame): try to create some more dynamism by for instance resorting to the rule of thirds, that is placing your main subject off center, near one of the corners of your frame, or positioning important elements in the frame along an imaginary diagonal line;
    • Know your camera’s commands well and select a focal length and an aperture suitable for what you are trying to accomplish: do you want to achieve a compressed look with quite shallow a depth of field? Select a telephoto lens. Do you want to place a strong subject in the immediate foreground in the context of a wider scene with greater depth of field and a clearer sense of depth? Go for a wide angle lens. Do you want more depth of field? Select a smaller aperture (bigger f/stop number). Do you want only a narrow area in your image to be in sharp focus with the remainder being rendered as a soft blur? Pick a large aperture (smaller f/stop number). Every tool (i.e., your lenses) should be used for the purpose it is intended for and ultimately to realize your vision.

2. Lighting

Lighting is the essence of photography (the very word “photography” comes from Greek and means “writing with light“) and yet it is an often overlooked component in a photograph. Almost never will a photograph taken in bad light look good. Once again, here are a few things to bear in mind while you are planning for your shoot:

  • If you want to photograph using natural light, never set up in direct sunlight (you would end up with harsh, unattractive contrast) – prefer the light of an overcast day or light coming from a northern facing window or skylight, but be prepared to supplement it with some extra light source so as to avoid that the image looks too flat – also, be ready to use a tripod (especially if youintend to use a smaller aperture) as your shutter speed will likely be fairly slow, unless you crank up the ISO which however may end up in a noisy (as in, grainy) image
  • Stay away at all costs from your camera’s pop-up flash and never place a flash head directly onto your camera’s hot shoe as this arrangement would give you flat, unattractive front light: remember, photography (like painting) is the art of creating the illusion of a 3D object in a 2D medium, and the key to achieve that is creating visible, pleasing shadows in your image
  • In order to create visible shadows you need to ensure that your main light source (AKA your key light) is off axis with your camera: side lighting and backlighting are both effective ways to create shadows
  • Generally, in food photography you want to achieve soft shadows and stay away from harsh, unpleasant shadows. The way to do this is to use a large light source or, if you don’t have one, to make your light source as big as you can: remember, the bigger the light source, the softer the shadows it will cast. This is why photographing food (or making people portraits) in natural light on an overcast day is something appropriate: thanks to the cloud cover, the sky turns into a gigantic source of diffused, soft light. In the studio, soft light can be achieved in several ways: by using a light modifier, such as a soft box (essentially, a big diffuser) or an umbrella (a reflector) or (assuming you have white walls and ceiling) by bouncing the light of your flash head off a wall or the ceiling
  • If you need to open up a bit the shadows that you have created, so as to reduce the contrast and provide more detail in the parts of your image that are in the shadow, you should use a fill light, which is another light source coming from a different direction and with a lesser intensity than your key light (you don’t want to obliterate your shadows altogether, you only want to make them lighter): a second flash head at a weaker setting or a reflector that bounces some of the light coming from your key light back into the scene are both good solutions to achieve this (tip: some aluminum kitchen foil crumbled and then flattened out works fairly well as an improvised silver reflector)

3. Post-Processing

Neither in the “good ol’ days” of film-based photography nor in nowadays digital photography world will a great image come straight out of the camera. While the old GIGO rule still applies (Garbage In, Garbage Out – meaning, if you start out with a bad image, it will be very difficult that you may turn it into a good one in post-processing alone), even a very solid image out of the camera will require some extent of post processing to become a great photograph. A few tips:

  • Shoot RAW, not Jpeg: by shooting RAW you will retain the maximum flexibility on your files and will not have to live with choices irreversibly made by the camera – the possibility of changing your white balance into whatever light temperature you desire is by itself totally worth the choice of shooting RAW instead of Jpeg
  • Learn how to use at least the basic features of Photoshop (or whatever other image editing software of your choice): at a minimum, learn how to crop your image (should you need to); how to work with levels and curves and with the dodge/burn tool to control contrast and exposure; how to use the saturation and color balance commands to control color; how to effectively sharpen an image; and finally how to work with layers so every change you make can be reversed at a later time if need be
  • Generally, be subtle with your changes and only aim them at optimizing your image so as to extract all of its potential from that digital file and turn a good image into a great one.

That’s it! I hope the above may be of help or inspiration to some of you to push the envelope a little bit and try to apply all or some of the above tips to your own food photography and see what comes out of it. And especially, have fun in the process and experiment!

If you are interested in seeing more of my food images, feel free to check out my photography Web site.

Painting with Light: Incense Cedar Tree at Night

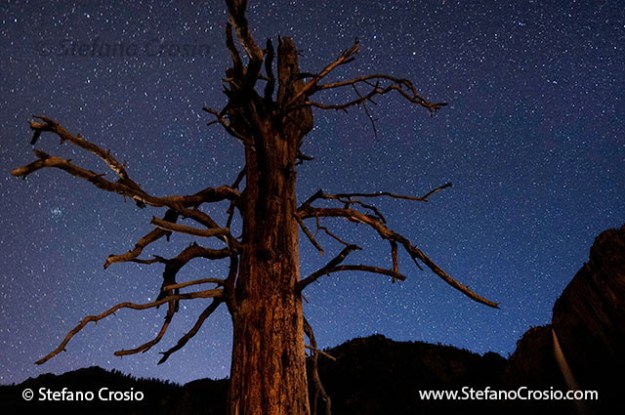
Incense cedar tree at night in Yosemite Valley, CA

This image was taken at night in Yosemite Valley, CA, where I set up my tripod before dark, focused my wide angle lens on this gnarled incense tree in the background, set a base exposure, composed my shot paying attention that no branches of the tree intersected the top of the surrounding mountains and waited for darkness to descend. Then it was just a question of taking several shots at different times at night, with the sky taking on different hues, and sometimes experimenting with “light painting”, as in this image.

Painting with light is a hit and miss technique that may be performed in night photography situations, and that is achieved by shining a flashlight on the foreground subject, or anyway a foreground element, to accentuate it and give it some texture in the final image. There are no hard and fast rules for how long to light your subject, and the photographer is best advised to take several shots with different intensities of lighting, as there is no way of telling which one will turn out to be the most pleasant one. On those circumstances I always take a few shots in full darkness too, with the tree that is completely silhouetted against the lighter sky, because sometimes those may turn out to be the best option.

In this case, however, I think the moderate amount of “light painting” on the incense tree works to the benefit of the image as it gives kind of an eerie feel to the gnarled tree, accentuating its tortured limbs that stretch out in all directions and one of which points to Yosemite Falls.

If you would like to see more images of mine, feel free to browse my Galleries.

As per my copyright notice, please respect my work and do not download, reproduce or use the image above without first seeking my consent. Thank you :-)

Pan Blur Technique and Barren-Ground Caribou

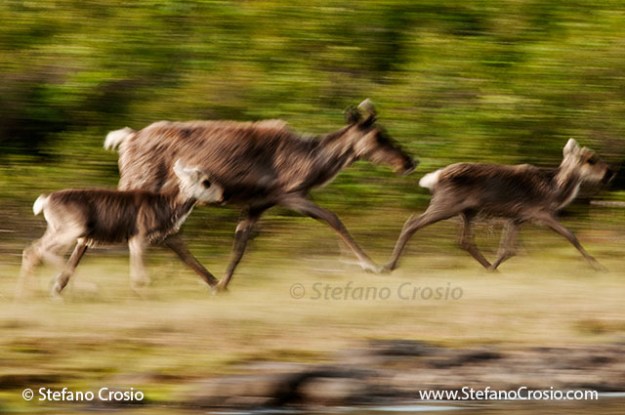
Pan blur of barren-ground caribou (Rangifer tarandus groenlandicus)

Before getting to the point of this post, let me just quickly say thank you to all of you who have been reading and following Clicks & Corks so far: this new blog was officially launched on February 10 and less than a month later it has had over 1,000 views, 210 comments and 71 followers. Your support and your active contributions to C&C are nothing short of exceptional and they are a phenomenal reward to the effort that goes into trying to publish quality content that hopefully many of you may find interesting and worth reading or viewing. Once again, thank you.

But let’s move on to today’s subject: pan blurs. Pan blurs are fun to do and sometimes they may offer a solution when freezing an action shot either is not an option or would not yield an interesting enough visual result (as would have been the case with the running barren-ground caribou cow and calves (Rangifer tarandus groenlandicus) that are portrayed in the image above).

Successful pan blurs convey a sense of motion in a painterly, sort of impressionistic way, as if the “light painter” behind the lens (all photographers are essentially painters who rely on the qualities of light instead of paint and paintbrushes!) had chosen a quick, thick and essential brushstroke style.

The situations in which I find myself using the pan blur technique the most are those when my subject is in motion and either light levels are so low that attaining a fast enough shutter speed to freeze the action would be impossible or impractical (as is often the case when photographing at the fringes of the day in the outdoors or in dark indoor contexts, such as a poorly lit gym or ice rink) or the subject and the context the subject is in are not interesting enough to be captured in a crisp, detailed shot that freezes the action. In these instances, instead of not taking any shot at all, I switch to pan blur gear and see what I come up with. A desire to convey a strong, visual sense of speed when photographing a fast living thing or object in motion may be another very good reason to resort to a pan blur.

Should you be wondering how to make a pan blur, just follow these steps:

  • Stick a telephoto lens on your camera;
  • Set your exposure using the M or S modes and pick a fairly slow shutter speed (how slow depends on how fast your subject is and how “streaky” you want your background to be, but somewhere between 1/8 and 1/60 sec should get you in the ballpark most of the times);
  • Set your AF system to an active tracking mode;
  • Position yourself such that your moving subject will be in front of you and its trajectory will run from one side to the other (left to right or right to left);
  • Stand still and, by rotating your torso/arms, aim your camera to the side your subject is supposed to come from;
  • As soon as your subject is in sight, lock focus on it and start tracking it by panning your camera in a fluid motion in sync with your subject and keeping it in the frame;
  • When your subject is by and large in front of you, without stopping your fluid panning motion, trip the shutter to expose one or more frames;
  • Keep tracking your subject for a few more moments just to make sure not to interrupt your panning when the shutter is still open.

The whole point of this technique is to blur the background and the moving parts of your subject (e.g., the limbs of a living thing, the wheels of a vehicle…) while retaining some key part of your subject relatively in focus (such as the head of a living thing or some distinctive feature in a vehicle).

Variants of this technique include the use of a flash set to rear curtain sync, which accentuates the sharpness of the subject while retaining the streaky background, or extreme pan blurs. Extreme pan blurs call for even slower shutter speeds so that not only the background but also the subject is blurred, although to some lesser extent than the background: when successfully performed, these shots may yield even more artistic, painterly abstract results, which can be equally rewarding.

Pan blurs are kind of hit and miss by definition, especially with fast moving subjects, so be prepared to take several practice shots to master this technique before using it in any important situation.

If you would like to see more images of mine, feel free to browse my Galleries.

As per my copyright notice, please respect my work and do not download, reproduce or use the image above without first seeking my consent. Thank you :-)

An Overview of the ISA Wine Pairing Criteria

As promised a while ago to Suzanne, the gracious author of food and cooking blog apuginthekitchen, in this post I will briefly go through the core foundations of food-wine pairing, providing an overview of the main criteria conceived and recommended by the Italian Sommelier Association (ISA). This should hopefully offer readers a few guidelines that they may consider trying out the next time they will need to pair a wine with food.

Our discussion about wine pairing will utilize certain of the concepts and terminology that we have gone through in the context of our overview of the ISA wine tasting protocol: if you are not familiar with it, consider reading that post before continuing on with this one.

The first step in the wine pairing process is to assess the food you intend to pair a wine with: in so doing, you should consider (and ideally write down) which of the following characteristics are present to a noticeable extent in your food:

  • Latent sweetness (this is that sweetish feel that you perceive eating such foods as bread, pasta, rice, potatoes, carrots, certain seafood such as shrimps or prawns, most ham, bacon, etc. – note, this is NOT the full-blown sweetness of a dessert)
  • Fatness (this refers to the presence of solid greases, such as in most cheeses, salame, hard-boiled egg yolk, etc.)
  • Tastiness (it is given by the presence of salt in a food, such as for instance in most cured meats, salame or cheeses)
  • Latent bitterness (it can be found in such foods as artichokes, raw spinach, radicchio, liver, grilled food, etc.)
  • Latent sourness (it is generally found in tomatoes, seafood marinated in lemon juice, salads with vinegar-based dressings, etc.)
  • Sweetness (typical of a dessert, honey or most fruits)
  • Aftertaste (meaning, whenever the flavor of the food tends to linger in your mouth after swallowing it – for instance, venison meat generally has a longer afterstate than veal meat)
  • Spiciness (this merely indicates the moderate use of spices in the preparation of the food, it does NOT indicate a “hot” food – examples are the use of saffron, curry, pepper, vanilla, etc. in foods like cured meats, risotto, desserts…)
  • Flavor (this indicates a noticeable, distinct flavor that is typical of a certain food or ingredient, such as in the case of blue cheese or goat cheese, salame, foods complemented by herbs, such as pesto sauce or butter and sage ravioli, coffee, cocoa…)
  • Juiciness (there are three types: (i) inherent, which is that of foods that have noticeable quantities of liquids in them, such as a fresh buffalo mozzarella or a meat cut cooked rare; (ii) due to the addition of liquids, such as a beef stew to which some kind of gravy or sauce was added, a brasato, etc.; and (iii) induced, which is that of salty or relatively dry foods, which cause abundant production of saliva in the mouth, such as in the case of a bit of aged Parmigiano Reggiano cheese)
  • Greasiness (caused by the presence of oil or other liquefied greases that is still noticeable in the mouth at the end of the preparation of the food, such as in a bruschetta, seafood salad, grilled sausage, etc.)
  • Structure (this depends on the complexity or the extent of elaboration of a food – for instance, a cracker with cheese or a bowl of white rice shall clearly be considered foods with little structure, while a dish of goulash or a Sacher torte shall be considered foods with significant structure)

Now, the core of the wine-food pairing criteria preached by the Italian Sommelier Association is that certain of the aforesaid qualities of a food (to the extent of course they are detectable to a noticeable extent in the food you want to identify a good wine pairing for) shall be paired by contrast with certain qualities of a wine (see below), while certain others of such food qualities shall instead be paired by association with the corresponding qualities in a wine.

Having said that, let’s now move on the second step and see specifically which qualities in a wine relate to the food qualities that we have listed above and how:

Food Quality


Wine Quality

(A) Pairings by Contrast

Latent sweetness ==> Acidity
     
Fatness ==> Effervescence or Minerality
     
Tastiness    

Latent bitterness

==> Smoothness

Latent sourness


Juiciness / Greasiness ==> ABV or Tannicity (by contrast)

(B) Pairings by Association

Sweetness ==> Sweetness
     
Spiciness / Flavor ==> Intensity of nose/mouth flavor
     
Aftertaste ==> Aftertaste or Finish

Wherever per the above guidelines a food quality presents an alternative in the choice of the related wine quality, structure of the food can often dictate which of the alternative wine qualities should be picked. So, for instance, in the case of the greasiness of a delicate seafood salad whose dressing is olive oil-based, the choice in the related wine quality should fall on a white wine with good ABV over a red wine with noticeable tannins, which would have a structure that would overwhelm the much simpler, more delicate structure of the seafood salad dish.

A few side notes on some “special situations“:

  • Very spicy (as in “hot”) food is very difficult to successfully pair: the best thing one can do is to pick a wine with plenty of smoothness and intensity in an effort to compensate, but if the food is too spicy, it will always overwhelm the wine
  • Particularly sour dishes are another challenge, such as in the case of salads with significant vinegar- or lemon-based dressings
  • Ice cream, gelato and sorbet are also tough pairings, because their cold nature makes taste buds even more susceptible to wine acidity, tannins or minerality – sometimes, the best bet is to pair them with a spirit (such as in the case of Granny Smith apple sorbet with Calvados or lemon sorbet with Vodka)

One last comment: the above guidelines are just that, guidelines that should offer you some pointers as to “which way to go” in your choices of which wines to pair with a certain food, but they are certainly not carved in stone, nor are they not meant to be breached now and then if you think there is good reason for it: ultimately, the bottom line is that whatever wine pairing you choose ends up being a pleasant one for your and your guests’ mouths!

Now have fun and experiment!  🙂