Tag Archives: blog

C&C Wine: A Few Updates and New Features

StefanoOver the last weeks I have added a few new features, updates and enhancements to the wine-related part of Clicks & Corks that I hope readers will find helpful in navigating the growing content of the blog. Below is a summary of what’s new:

1. As requested by several readers, I have added symbol-based quality ratings and pricing information to all reviewed wines based on a scale from 1 to 5

2. I have added a new page that explains the quality ratings and pricing symbols

3. I have added a new index page with links to all reviewed wines, breaking them down by country and type and indicating their symbol-based rating and price point

4. I have slightly revisited the format of my wine reviews, moving my conclusions about the wine and its rating to the top of the post so if someone just wants to read the short of it, they can do so right away without having to scroll down to the end of the post – of course, those who enjoy learning more about the producer, the varieties, the appellation and how the wine did in my detailed ISA-compliant tasting, they can still do so by reading on!

5. I have created a new page listing those reviewed wines that in my view have the best quality to price ratio in the pricing bands (i) $20 and below and (ii) $21 to $40

6. I have updated the Grape Variety Archive with several new varieties: take the time to check them out!

That’s all for now: hope you find these changes helpful.

Any comment, new feature request or feedback is always welcome through the comment section below!

Advertisement

Wine Review: Cloudy Bay, Sauvignon Blanc Marlborough 2012

Cloudy Bay, Sauvignon Blanc Marlborough
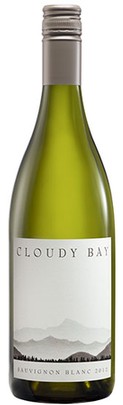
Ever since fellow wine blogger and friend Oliver was kind enough to ask me to contribute a guest post to his excellent blog, The Winegetter, I have been really excited about the idea. Since the theme was “Somewhere Beyond the Sea” and the post was going to be published in the summertime, I thought reviewing one of my favorite New Zealand Sauvignon Blancs (Cloudy BaySauvignon Blanc Marlborough 2012 – $30) would just be the way to go: definitely “somewhere beyond the sea” pretty much from anywhere you look at it (unless of course you are a Kiwi!) and a refreshing summer wine. So there we go – and of course: (i) you may find this post also in Oliver’s blog and (ii) thank you so much, Oliver, for including me in your list of distinguished guest contributors – I feel honored and it has been a lot of fun!

The Bottom Line

Overall, I think that Cloudy Bay is a very pleasant Sauvignon Blanc in the “Down Under” style: intense, concentrated fruit and herb aromas, lively acidity and citrus-centric flavors. So very refreshing and summery that I would keep drinking it all Summer long… if budget permitted!  😉

Rating: Very Good and Recommended Very Good – $$

(Explanation of our Rating and Pricing Systems)

About the Grape

A few interesting notions about the origins of Sauvignon Blanc: recent DNA analysis has identified a parent-offspring relationship between Savagnin (an old white-berried variety that is common in the Jura region of France) and Sauvignon Blanc and, there being much earlier documents mentioning Savagnin than Sauvignon Blanc, the former is believed to be the parent of the latter. DNA results also support the thesis that, contrary to common belief, Sauvignon Blanc did not originate from the Bordeaux area, but rather from the Loire Valley in France, where documental evidence dates back to 1534 (compared to 1710 in Bordeaux). However, it is interesting to note that, when Sauvignon Blanc was grown in the Bordeaux area, it spontaneously crossed with Cabernet Franc to create Cabernet Sauvignon.

In New Zealand, Sauvignon Blanc was first planted in the 1970s and soon became the most widely grown variety in the country, especially in the Marlborough region.

(Information on the grape varieties taken from Wine Grapes, by Robinson-Harding-Vouillamoz, Allen Lane 2012  – for more information about grape varieties, check out our Grape Variety Archive)

About the Estate

Cloudy Bay‘s vineyards are located in different subzones of the premium wine region of Marlborough at the northern end of New Zealand’s South Island, alongside the Wairau River. Cloudy Bay also sources part of the grapes used for making their wines from a few independent Wairau Valley growers with whom they have established a long-term business relationship.

Our Detailed Review

Let’s now get to the actual review of Cloudy Bay, Sauvignon Blanc Marlborough 2012, which in the US retails for about $30.

The wine has 13.5% ABV and was made from 100% Sauvignon Blanc grapes sourced from estate and grower vineyards located in the Rapaura, Fairhall, Renwick and Brancott subzones of the Wairau Valley. Fermentation was primarily carried out in stainless steel, except for a small percentage that was fermented in old French oak barriques.

As usual, for my review I will use a simplified version of the ISA wine tasting protocol that we described in a previous post: should you have doubts as to any of the terms used below please refer to that post for a refresher.

In the glass, the wine poured crystal clear, a beautiful straw yellow in color, and thick with narrow arches and slow dripping tears

On the nose, its bouquet was intense, complex and fine, with pleasant, Summer-y aromas of lime, grapefruit, citrus, green apple and herbs (nettle, mint)

In the mouth, it was dry, quite warm, quite smooth; fresh, quite tasty. The wine was medium-bodied and balanced, despite its freshness (i.e., acidity) being the dominating component – but that is in most cases a desirable feature in a dry white wine and in our case it also helped make the quite muscular ABV of the wine not so evident in the mouth, which is a good thing, so it did not change our assessment that the wine was balanced. Its mouth flavors were intense and fine, with pleasant, refreshing notes of lime, grapefruit, citrus and herbs. The wine’s finish was quite long and its evolutionary state was mature, meaning ready to be enjoyed now, with additional cellaring not likely to benefit the wine.

New Resource: The Grape Variety Archive

Wine Grapes, by Robinson-Harding-Vouillamoz, Allen Lane 2012

I would like to share with you all a pretty cool new wine-related resource that just recently went live on this blog and on Flora’s Table: I am talking about a new page called Grape Variety Archive that combines alphabetically, in one centralized spot, all the information about the grape varieties of the wines that I have reviewed, so that such information may be easily referred to by readers.

What’s even better is that all of the grape variety information on the Grape Variety Archive has been taken from the wonderfully educational, gorgeously illustrated and scientifically researched volume “Wine Grapesauthored by Jancis Robinson, Julia Harding and Jose Vouillamoz, Allen Lane 2012. Wine Grapes is an impressive 1,242 page long collection of detailed and up to date information about 1,368 vine varieties from all over the world. Quoting directly from the Web site dedicated to the book:

Where do wine grapes come from and how are vine varieties related to each other? What is the historical background of each grape variety? Where are they grown? What sort of wines do they make? Using the most cutting-edge DNA analysis and detailing almost 1,400 distinct grape varieties, as well as myriad correct (and incorrect) synonyms, this particularly beautiful book examines viticulture, grapes and wine as never before. Here is a complete, alphabetically presented profile of all grape varieties relevant to today’s wine lover.

I don’t think I need to say much about the authors, as if you are into wine they are all very well known, but just in case: Jancis Robinson has been a wine writer since 1975 and the Financial Times’s wine correspondent since 1989. Her principal occupation now is taking care of her own Web site, JancisRobinson.com, which gets updated daily. Julia Harding is a linguist, an editor and a qualified Master of Wine. She is Jancis Robinson’s full-time assistant and “associate palate”. Dr José Vouillamoz is a Swiss botanist and grape geneticist of international repute. He was trained in grape DNA profiling and parentage analyses in the world-famous laboratory of Professor Carole Meredith at the University of California at Davis.

And speaking of the authors, I wish to take the opportunity to sincerely thank them for being so kind and generous as to grant me permission to pull together and publish the Grape Variety Archive page, which I think can become over time a great resource for gaining a quick snapshot of the various varieties that make up the wines that I review on this blog, beside giving readers an idea of the amazing wealth of information that can be found in Wine Grapes.

Wine Grapes, by Robinson-Harding-Vouillamoz, Allen Lane 2012

If you read this and are seriously into wine, I think you should definitely consider acquiring Wine Grapes as it will provide a ton of invaluable information about everything that you may want to know about grape varieties. Besides, let me tell you: Dr Vouillamoz’s DNA profiling work about all the grape varieties in the book is nothing short of unbelievable and well worth the price of the book in and of itself!

Please check our new page out and let me know what you think!

Oh, one final note: congratulations to fellow wine blogger and friend Oliver AKA The Winegetter who has been the first one to like the new page, even before its official roll out! Thank you, Oliver!  🙂

A Food Photography Primer

Over time, a few readers over at Flora’s Table who seem to have been enjoying the food images that I make and publish in that blog have been asking that I write a post with a few pointers about food photography: today is the day for that. Bear in mind that what follows is not intended to be a comprehensive course on food photography, but just a reflection on some basic rules of photography that play an important role in making a good food photograph.

There is no magic, food is just one of the subjects of studio photography and food photography is still photography, so the same basic principles apply. As such, there are three main guiding criteria that everyone with an interest in food photography should focus on:

1. Composition
2. Lighting
3. Post-Processing

Let’s take a closer look at each of them.

1. Composition

Composition is an element that can literally make or break a photograph. A successful image, including one of a food item, needs to have a strong, clean, balanced composition or it will look flat and boring at best. Here are a few pointers as to how to tackle this aspect:

  • Devise a plan before your shoot: pre-visualize how you would like your image to look like and figure out what you need to accomplish your vision (in terms of props, lighting, background and focal length of your lens)
  • Set up well ahead of time, when you have no time pressure: the shoot should be set up according to your plan and your vision, with everything in place except the food you are going to photograph. Take a few test shots in the same light that you would use for the real thing and see how your image looks like through the lens you chose. Use this opportunity to find out what does not work and to move things around or change camera/lighting settings until you achieve a pleasing composition that conveys your vision. Add the actual food item to be photographed only when you are all set and ready to go, so when you photograph it, it is going to be perfectly fresh, in top condition
  • Although composition is subjective and should convey your own vision, there are a few “rules” that will generally make your image a stronger one, including the following:
    • Less is more: keep your composition clean and simple;
    • Compose in such a way that the main subject of your image is immediately obvious to everyone;
    • Avoid blank space near the edges of your frame: make sure that your subject and other meaningful elements of your composition fill the frame in a balanced and pleasing way, making sure that you have a strong foreground, middle ground and background in your image;
    • Very rarely does a subject that is in the smack center of your image look good (unless you are going for an extreme close-up where your subject fills the entire frame): try to create some more dynamism by for instance resorting to the rule of thirds, that is placing your main subject off center, near one of the corners of your frame, or positioning important elements in the frame along an imaginary diagonal line;
    • Know your camera’s commands well and select a focal length and an aperture suitable for what you are trying to accomplish: do you want to achieve a compressed look with quite shallow a depth of field? Select a telephoto lens. Do you want to place a strong subject in the immediate foreground in the context of a wider scene with greater depth of field and a clearer sense of depth? Go for a wide angle lens. Do you want more depth of field? Select a smaller aperture (bigger f/stop number). Do you want only a narrow area in your image to be in sharp focus with the remainder being rendered as a soft blur? Pick a large aperture (smaller f/stop number). Every tool (i.e., your lenses) should be used for the purpose it is intended for and ultimately to realize your vision.

2. Lighting

Lighting is the essence of photography (the very word “photography” comes from Greek and means “writing with light“) and yet it is an often overlooked component in a photograph. Almost never will a photograph taken in bad light look good. Once again, here are a few things to bear in mind while you are planning for your shoot:

  • If you want to photograph using natural light, never set up in direct sunlight (you would end up with harsh, unattractive contrast) – prefer the light of an overcast day or light coming from a northern facing window or skylight, but be prepared to supplement it with some extra light source so as to avoid that the image looks too flat – also, be ready to use a tripod (especially if youintend to use a smaller aperture) as your shutter speed will likely be fairly slow, unless you crank up the ISO which however may end up in a noisy (as in, grainy) image
  • Stay away at all costs from your camera’s pop-up flash and never place a flash head directly onto your camera’s hot shoe as this arrangement would give you flat, unattractive front light: remember, photography (like painting) is the art of creating the illusion of a 3D object in a 2D medium, and the key to achieve that is creating visible, pleasing shadows in your image
  • In order to create visible shadows you need to ensure that your main light source (AKA your key light) is off axis with your camera: side lighting and backlighting are both effective ways to create shadows
  • Generally, in food photography you want to achieve soft shadows and stay away from harsh, unpleasant shadows. The way to do this is to use a large light source or, if you don’t have one, to make your light source as big as you can: remember, the bigger the light source, the softer the shadows it will cast. This is why photographing food (or making people portraits) in natural light on an overcast day is something appropriate: thanks to the cloud cover, the sky turns into a gigantic source of diffused, soft light. In the studio, soft light can be achieved in several ways: by using a light modifier, such as a soft box (essentially, a big diffuser) or an umbrella (a reflector) or (assuming you have white walls and ceiling) by bouncing the light of your flash head off a wall or the ceiling
  • If you need to open up a bit the shadows that you have created, so as to reduce the contrast and provide more detail in the parts of your image that are in the shadow, you should use a fill light, which is another light source coming from a different direction and with a lesser intensity than your key light (you don’t want to obliterate your shadows altogether, you only want to make them lighter): a second flash head at a weaker setting or a reflector that bounces some of the light coming from your key light back into the scene are both good solutions to achieve this (tip: some aluminum kitchen foil crumbled and then flattened out works fairly well as an improvised silver reflector)

3. Post-Processing

Neither in the “good ol’ days” of film-based photography nor in nowadays digital photography world will a great image come straight out of the camera. While the old GIGO rule still applies (Garbage In, Garbage Out – meaning, if you start out with a bad image, it will be very difficult that you may turn it into a good one in post-processing alone), even a very solid image out of the camera will require some extent of post processing to become a great photograph. A few tips:

  • Shoot RAW, not Jpeg: by shooting RAW you will retain the maximum flexibility on your files and will not have to live with choices irreversibly made by the camera – the possibility of changing your white balance into whatever light temperature you desire is by itself totally worth the choice of shooting RAW instead of Jpeg
  • Learn how to use at least the basic features of Photoshop (or whatever other image editing software of your choice): at a minimum, learn how to crop your image (should you need to); how to work with levels and curves and with the dodge/burn tool to control contrast and exposure; how to use the saturation and color balance commands to control color; how to effectively sharpen an image; and finally how to work with layers so every change you make can be reversed at a later time if need be
  • Generally, be subtle with your changes and only aim them at optimizing your image so as to extract all of its potential from that digital file and turn a good image into a great one.

That’s it! I hope the above may be of help or inspiration to some of you to push the envelope a little bit and try to apply all or some of the above tips to your own food photography and see what comes out of it. And especially, have fun in the process and experiment!

If you are interested in seeing more of my food images, feel free to check out my photography Web site.

Clicks & Corks is Foodista’s Featured Drink Blog of the Day!


Foodista

Looks like the Easter Bunny came one day early here – something happened today that I found pretty cool and that I want to share with all of you: a couple of hours ago I received an email from an editor of Foodista – the cooking encyclopedia and food news source informing me that Clicks & Corks has been picked as Foodista’s Featured Drink Blog of the Day!

My post An Overview of the ISA Wine Pairing Criteria will be featured on the Foodista home page today (on the sidebar on the right) and will be included in their Drink Blog of the Day Archive.

I am excited and honored that this new blog has been picked by Foodista’s editors and featured on the Web site of that thriving food lovers’ community.

If you are interested, go check them out at www.foodista.com

Happy Easter everyone!

Foodista Drink Blog of the Day Badge